Qt Quick 3D - Quick Ball Example
Demonstrates how to create a simple game using Quick3D.

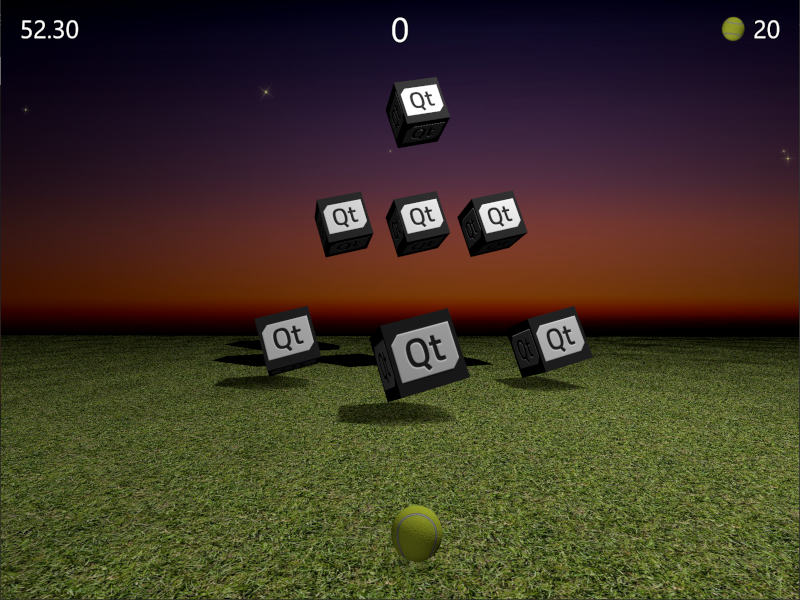
This example demonstrates how to combine Qt Quick and Qt Quick 3D to create a simple 3D game. The goal of the game is to hit target boxes by throwing a ball. Points are given based on how fast and with how few balls all targets are down. Aim well but be quick!
The source code is in a single QML file to emphasize how compact this example is, considering it being a fully playable game. Let's start by looking at the main properties. These are quite self-explanatory, and you can easily adjust them to see how they affect the game.
 // Scaling helpper
 readonly property real px: 0.2 + Math.min(width, height) / 800
 // This is false until the first game has started
 property bool playingStarted: false
 // This is true whenever game is on
 property bool gameOn: false
 // Sizes of our 3D models
 readonly property real ballSize: 40
 readonly property real targetSize: 120
 // Playing time in seconds
 readonly property real gameTime: 60
 property real currentTime: 0
 // Amount of balls per game
 readonly property int gameBalls: 20
 property int currentBalls: 0
 // Scores
 property int score: 0
 property int timeBonus: 0
 property int ballsBonus: 0
The game logic is implemented with JavaScript. View3D contains a function to start the game, which (re)initializes all required variables and creates the level targets. It also contains a function to calculate the final points when the game ends.
 function createLevel1() {
     // Simple level of target items
     var level1 = [{ "x": 0, "y": 100, "z": -100, "points": 10 },
                   { "x": -300, "y": 100, "z": -400, "points": 10 },
                   { "x": 300, "y": 100, "z": -400, "points": 10 },
                   { "x": -200, "y": 400, "z": -600, "points": 20 },
                   { "x": 0, "y": 400, "z": -600, "points": 20 },
                   { "x": 200, "y": 400, "z": -600, "points": 20 },
                   { "x": 0, "y": 700, "z": -600, "points": 30 }];
     targetsNode.addTargets(level1);
 }

 function startGame() {
     ballModel.resetBall();
     targetsNode.resetTargets();
     createLevel1();
     score = timeBonus = ballsBonus = 0;
     currentBalls = gameBalls;
     gameOn = true;
     playingStarted = true;
 }

 function endGame() {
     if (targetsNode.currentTargets == 0) {
         // If we managed to get all targets down -> bonus points!
         timeBonus = mainWindow.currentTime;
         ballsBonus = currentBalls * 10;
     }
     gameOn = false;
     ballModel.resetBall();
 }
The view also contains a PointLight node to light up the scene. It is positioned above the objects and set to cast shadows. Note how brightness is used to darken the playing area when then game has ended. The ambientColor property is used to soften the light contrast, as without it the bottom parts of the objects would be very dark.
 PointLight {
     x: 400
     y: 1200
     castsShadow: true
     shadowMapQuality: Light.ShadowMapQualityHigh
     shadowFactor: 50
     quadraticFade: 2
     ambientColor: "#202020"
     brightness: mainWindow.gameOn ? 200 : 40
     Behavior on brightness {
         NumberAnimation {
             duration: 1000
             easing.type: Easing.InOutQuad
         }
     }
 }
Throwing the ball uses Qt Quick MouseArea item, which is only enabled when game is on, and the ball isn't already moving.
 MouseArea {
     anchors.fill: parent
     enabled: mainWindow.gameOn && !ballModel.ballMoving
     onPressed: {
         ballModel.moveBall(mouseX, mouseY);
     }
     onPositionChanged: {
         ballModel.moveBall(mouseX, mouseY);
     }
     onReleased: {
         ballModel.throwBall();
     }
 }
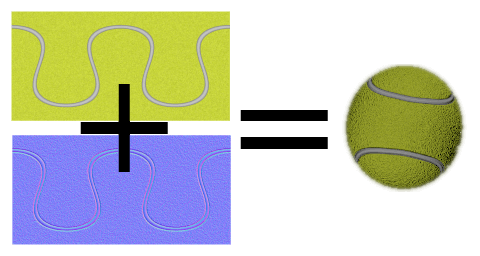
Then we get into actual 3D models. Ball model is the biggest one, as it contains the logic how the ball behaves, its animations, and hit detection. Let's look into the ball properties first. Ball uses a built-in sphere model, scaled based on ballSize. We use PrincipledMaterial with a baseColorMap and a normalMap to create tennis ball appearance.

 Model {
     id: ballModel
     property real directionX: 0
     property real directionY: 0
     // How many ms the ball flies
     readonly property real speed: 2000
     readonly property real ballScale: mainWindow.ballSize / 100
     property var moves: []
     readonly property int maxMoves: 5
     readonly property bool ballMoving: ballAnimation.running

     source: "#Sphere"
     scale: Qt.vector3d(ballScale, ballScale, ballScale)

     materials: PrincipledMaterial {
         baseColorMap: Texture {
             source: "images/ball.jpg"
         }
         normalMap: Texture {
             source: "images/ball_n.jpg"
         }
         normalStrength: 1.0
     }
When mouse is moved or touch-screen is swiped, last maxMoves positions before releasing the ball are stored into moves array. When user releases the ball, throwBall() gets called, which calculates the ball direction from these latest positions, and starts animating it.
 function resetBall() {
     moves = [];
     x = 0;
     y = mainWindow.ballSize/2;
     z = 400;
 }

 function moveBall(posX, posY) {
     if (!mainWindow.gameOn) return;
     var pos = view3D.mapTo3DScene(Qt.vector3d(posX, posY, ballModel.z + mainWindow.ballSize));
     pos.y = Math.max(mainWindow.ballSize / 2, pos.y);
     var point = {"x": pos.x, "y": pos.y };
     moves.push(point);
     if (moves.length > maxMoves) moves.shift();
     // Apply position into ball model
     ballModel.x = pos.x;
     ballModel.y = pos.y;
 }

 function throwBall() {
     if (!mainWindow.gameOn) return;
     mainWindow.currentBalls--;
     var moveX = 0;
     var moveY = 0;
     if (moves.length >= 2) {
         var first = moves.shift();
         var last = moves.pop();
         moveX = last.x - first.x;
         moveY = last.y - first.y;
         if (moveY < 0) moveY = 0;
     }
     directionX = moveX * 20;
     directionY = moveY * 4;
     ballAnimation.start();
 }
The ball position is animated separately among different axis. These animations use previously assigned directionX and directionY to define where the ball moves to, as well as speed for the ball flying time. Vertical position has two sequential animations, so we can use easing for ball bounce. When position animations finish, we'll check if there are still balls left or should the game end. Finally we animate also rotation of the ball, so user can throw curve balls.
 ParallelAnimation {
     id: ballAnimation
     running: false
     // Move forward
     NumberAnimation {
         target: ballModel
         property: "z"
         duration: ballModel.speed
         to: -ballModel.directionY * 5
         easing.type: Easing.OutQuad
     }
     // Move up & down with a bounce
     SequentialAnimation {
         NumberAnimation {
             target: ballModel
             property: "y"
             duration: ballModel.speed * (1 / 3)
             to: ballModel.y + ballModel.directionY
             easing.type: Easing.OutQuad
         }
         NumberAnimation {
             target: ballModel
             property: "y"
             duration: ballModel.speed * (2 / 3)
             to: mainWindow.ballSize / 4
             easing.type: Easing.OutBounce
         }
     }
     // Move sideways
     NumberAnimation {
         target: ballModel
         property: "x"
         duration: ballModel.speed
         to: ballModel.x + ballModel.directionX
     }

     onFinished: {
         if (mainWindow.currentBalls <= 0)
             view3D.endGame();
         ballModel.resetBall();
     }
 }

 NumberAnimation on eulerRotation.z {
     running: ballModel.ballMoving
     loops: Animation.Infinite
     from: ballModel.directionX < 0 ? 0 : 720
     to: 360
     duration: 10000 / (2 + Math.abs(ballModel.directionX * 0.05))
 }
Important part of the game playing is detecting when the ball hits the targets. Whenever ball z position changes, we loop through targets array and detect if ball is touching any of them using fuzzyEquals(). Whenever we detect a hit, we'll call target hit() function and check if all targets are down.
 onZChanged: {
     // Loop through target items and detect collisions
     var hitMargin = mainWindow.ballSize / 2 + mainWindow.targetSize / 2;
     for (var i = 0; i < targetsNode.targets.length; ++i) {
         var target = targetsNode.targets[i];
         var targetPos = target.scenePosition;
         var hit = ballModel.scenePosition.fuzzyEquals(targetPos, hitMargin);
         if (hit) {
             target.hit();
             if (targetsNode.currentTargets <= 0)
                 view3D.endGame();
         }
     }
 }
Then we can switch to targets. Those are dynamically generated into a grouping node which contains helper functions and allows e.g. animating all targets as a group. Note that currentTargets property is needed because in QML arrays changes are not triggering bindings, so we will update the amount of targets manually.
 Node {
     id: targetsNode

     property var targets: []
     property int currentTargets: 0

     function addTargets(items) {
         items.forEach(function (item) {
             let instance = targetComponent.createObject(
                     targetsNode, { "x": item.x, "startPosY": item.y, "z": item.z, "points": item.points});
             targets.push(instance);
         });
         currentTargets = targets.length;
     }

     function removeTarget(item) {
         var index = targets.indexOf(item);
         targets.splice(index, 1);
         currentTargets = targets.length;
     }

     function resetTargets() {
         while (targets.length > 0)
             targets.pop().destroy();
         currentTargets = targets.length;
     }
 }
Targets are nodes with a cube model and a text element for showing points. Similarly to the ball model, we use baseColorMap and normalMap textures to create cubes with a Qt logo. When the hit is detected, we sequentially animate the cube away and show the points gained from this target. Once the animation is finished, we will dynamically remove the target node.
 Component {
     id: targetComponent
     Node {
         id: targetNode

         property int points: 0
         property real hide: 0
         property real startPosY: 0
         property real posY: 0
         property real pointsOpacity: 0

         function hit() {
             targetsNode.removeTarget(this);
             mainWindow.score += points;
             hitAnimation.start();
             var burstPos = targetNode.mapPositionToScene(Qt.vector3d(0, 0, 0));
             hitParticleEmitter.burst(100, 200, burstPos);
         }

         y: startPosY + posY
         SequentialAnimation {
             running: mainWindow.gameOn && !hitAnimation.running
             loops: Animation.Infinite
             NumberAnimation {
                 target: targetNode
                 property: "posY"
                 from: 0
                 to: 150
                 duration: 3000
                 easing.type: Easing.InOutQuad
             }
             NumberAnimation {
                 target: targetNode
                 property: "posY"
                 to: 0
                 duration: 1500
                 easing.type: Easing.InOutQuad
             }
         }

         SequentialAnimation {
             id: hitAnimation
             NumberAnimation {
                 target: targetNode
                 property: "hide"
                 to: 1
                 duration: 800
                 easing.type: Easing.InOutQuad
             }
             NumberAnimation {
                 target: targetNode
                 property: "pointsOpacity"
                 to: 1
                 duration: 1000
                 easing.type: Easing.InOutQuad
             }
             NumberAnimation {
                 target: targetNode
                 property: "pointsOpacity"
                 to: 0
                 duration: 200
                 easing.type: Easing.InOutQuad
             }
             ScriptAction {
                 script: targetNode.destroy();
             }
         }

         Model {
             id: targetModel

             readonly property real targetScale: (1 + targetNode.hide) * (mainWindow.targetSize / 100)

             source: "#Cube"
             scale: Qt.vector3d(targetScale, targetScale, targetScale)
             opacity: 0.99 - targetNode.hide * 2
             materials: PrincipledMaterial {
                 baseColorMap: Texture {
                     source: "images/qt_logo.jpg"
                 }
                 normalMap: Texture {
                     source: "images/qt_logo_n.jpg"
                 }
                 normalStrength: 1.0
             }
             Vector3dAnimation on eulerRotation {
                 loops: Animation.Infinite
                 duration: 5000
                 from: Qt.vector3d(0, 0, 0)
                 to: Qt.vector3d(360, 360, 360)
             }
         }
         Text {
             anchors.centerIn: parent
             scale: 1 + targetNode.pointsOpacity
             opacity: targetNode.pointsOpacity
             text: targetNode.points
             font.pixelSize: 60 * mainWindow.px
             color: "#808000"
             style: Text.Outline
             styleColor: "#f0f000"
         }
     }
 }
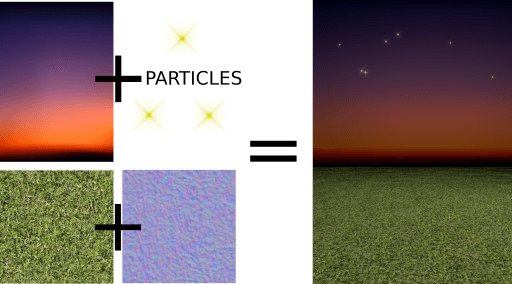
We also need some models for the playing area. Ground model is a rectangle with grass textures scaled to fill a larger area.
 Model {
     source: "#Rectangle"
     scale: Qt.vector3d(50, 50, 1)
     eulerRotation.x: -90
     materials: PrincipledMaterial {
         baseColorMap: Texture {
             source: "images/grass.jpg"
             tilingModeHorizontal: Texture.Repeat
             tilingModeVertical: Texture.Repeat
             scaleU: 25.0
             scaleV: 25.0
         }
         normalMap: Texture {
             source: "images/grass_n.jpg"
         }
         normalStrength: 0.6
     }
 }
Sky model is further back, and we don't want shadows cast into the sky, so we set receivesShadows to false. For the sky we also add some stars using Qt Quick Particles module. Similarly to other 2D Qt Quick elements, also particles can be directly added inside 3D nodes.
 Model {
     id: sky
     property real scaleX: 100
     property real scaleY: 20
     source: "#Rectangle"
     scale: Qt.vector3d(sky.scaleX, sky.scaleY, 1)
     position: Qt.vector3d(0, 960, -2000)
     // We don't want shadows casted into sky
     receivesShadows: false
     materials: PrincipledMaterial {
         baseColorMap: Texture {
             source: "images/sky.jpg"
         }
     }
     // Star particles
     Node {
         z: 500
         y: 30
         // Stars are far away, scale up to half the resolution
         scale: Qt.vector3d(2 / sky.scaleX, 2 / sky.scaleY, 1)
         ParticleSystem {
             anchors.horizontalCenter: parent.horizontalCenter
             anchors.top: parent.top
             width: 3000
             height: 400
             ImageParticle {
                 source: "qrc:///particleresources/star.png"
                 rotationVariation: 360
                 color: "#ffffa0"
                 colorVariation: 0.1
             }
             Emitter {
                 anchors.fill: parent
                 emitRate: 4
                 lifeSpan: 6000
                 lifeSpanVariation: 4000
                 size: 30
                 sizeVariation: 20
             }
         }
     }
 }
When we combine the above ground and sky models we get a 3D world like this:

Finally we add some sparkles for the targets, this time using the QtQuick3D.Particles3D module. ParticleSystem3D contains a SpriteParticle3D and we allocate 200 or them, which is enough for two simultaneous 100 particle bursts. ParticleEmitter3D defines the emitting properties for the particles like scale, rotation, velocity and lifeSpan. We also add Gravity3D affector to drag the particles down with a suitable magnitude.
 ParticleSystem3D {
     id: psystem
     SpriteParticle3D {
         id: sprite
         sprite: Texture {
             source: "images/particle.png"
         }
         color: Qt.rgba(1.0, 1.0, 0.0, 1.0)
         colorVariation: Qt.vector4d(0.4, 0.6, 0.0, 0.0)
         unifiedColorVariation: true
         maxAmount: 200
     }
     ParticleEmitter3D {
         id: hitParticleEmitter
         particle: sprite
         particleScale: 4.0
         particleScaleVariation: 2.0
         particleRotationVariation: Qt.vector3d(0, 0, 180)
         particleRotationVelocityVariation: Qt.vector3d(0, 0, 250)
         velocity: VectorDirection3D {
             direction: Qt.vector3d(0, 300, 0)
             directionVariation: Qt.vector3d(200, 150, 100)
         }
         lifeSpan: 800
         lifeSpanVariation: 200
         depthBias: 100
     }
     Gravity3D {
         magnitude: 600
     }
 }
This ends the 3D parts of our game. There are still some 2D Qt Quick elements to show the time, scores, start button etc. which are important for the game, but not relevant for this Quick 3D documentation.
Now the ball is on your side (pun intended). Feel free to extend the game in different ways and generate new wacky levels!